Maps in world 5 are the only regular maps that you can use support expeditions to help with your sortie.
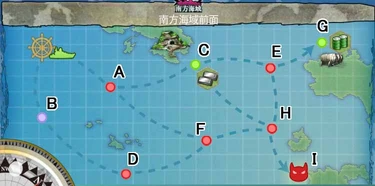
World 5-1: 南方海域前面 The Forefront of the Southern Sea[]
 |
| Сложность | ☆ ☆ ☆ ☆ ☆ ☆ ☆ ☆ | Предметы | |
| Опыт | 360 | Название операции | 南方海域進出作戦 (Southern Sea Advancement Tactics) |
| Суть операции | 練度の高い水上打撃部隊を編成し、南方海域への進出を図れ!
Create a diverse surface fleet to expand into the southern sea area! | ||
Stage Guide[]
| Branching Rules | ||
|---|---|---|
| Nodes | Movement Condition | |
| Sortie | A |
|
| B | ||
| A | C |
|
| F | ||
| C | E |
|
| H | ||
| H | E |
|
| I | ||
Tips[]
- Two CA/CAV to guarantee sortie start -> A and H -> I (boss) route
- Two DD for C to H.
- Node D is an all sub node, Node A has 2/3 chance of having one sub, and Boss Node I has 1/3 chance of having one sub
- A convenient place to level subs. Node D is all subs (neither side can harm each other) and rewards 753 exp (Flagship & MVP (auto)) for a D rank clear, although, moving to node A can result in heavy damage.
Nodes and Enemy Encounters[]
Drops[]
| Node | Destroyer | Light Cruiser | Heavy Cruiser | Seaplane Tender | Aircraft Carrier | Submarine | Battleship |
|---|---|---|---|---|---|---|---|
| A | Mutsuki, Kisaragi, Satsuki, Nagatsuki, Fumizuki, Kikuzuki, Mikazuki, Mochizuki, Hatsuharu, Shiratsuyu, Murakumo, Shigure | Ooi, Kitakami, Tama, Kiso, Isuzu, Natori, Yura, Jintsuu, Naka | Mogami, Furutaka, Kako, Aoba, Myoukou, Nachi, Ashigara, Haguro, Atago, Maya, Choukai, Tone, Chikuma | Chitose, Chiyoda | Ryuujou, Hiyou, Jun'you, Shouhou | Kongou, Hiei, Haruna, Kirishima, Fusou, Yamashiro | |
| D | Murakumo, Kisaragi, Satsuki, Nagatsuki, Hatsuharu, Shiratsuyu, Shigure, Yuudachi | Ooi, Kitakami, Tama, Kiso, Isuzu, Natori, Yura, Jintsuu, Naka | Mogami, Suzuya, Furutaka, Kako, Aoba, Myoukou, Nachi, Ashigara, Haguro, Takao, Atago, Maya, Choukai, Tone, Chikuma | Chitose, Chiyoda | Ryuujou, Hiyou, Shouhou, Souryuu | Kongou, Hiei, Haruna, Kirishima, Fusou, Yamashiro | |
| E | Mutsuki, Kisaragi, Satsuki, Kikuzuki, Mochizuki, Hatsuharu, Murasame | Ooi, Tama, Kiso, Isuzu, Yura, Naka | Kako, Aoba, Myoukou, Haguro, Maya, Choukai, Chikuma | Chitose, Chiyoda | Jun'you, Shouhou | Kongou, Hiei, Haruna, Yamashiro | |
| F | Murakumo, Mutsuki, Kisaragi, Satsuki, Fumizuki, Nagatsuki, Mikazuki, Mochizuki, Hatsuharu, Shiratsuyu, Shigure, Yuudachi | Ooi, Kitakami, Kiso, Isuzu, Natori, Yura, Jintsuu, Naka | Furutaka, Kako, Myoukou, Nachi, Ashigara, Takao, Maya, Choukai | Chitose, Chiyoda | Jun'you, Shouhou | Kongou, Hiei, Haruna, Kirishima, Fusou, Yamashiro | |
| H | Murakumo, Kisaragi, Satsuki, Fumizuki, Mikazuki, Mochizuki, Hatsuharu, Shiratsuyu, Murasame, Yuudachi | Ooi, Kitakami, Tama, Kiso, Isuzu, Natori, Yura, Jintsuu, Naka | Mogami, Myoukou, Nachi, Ashigara, Haguro, Tone, Chikuma, Takao, Atago | Chitose, Chiyoda | Ryuujou, Hiyou, Shouhou | Kongou, Hiei, Haruna, Kirishima | |
| I | Shimakaze, Akigumo, Yuugumo, Naganami, Yayoi, Uzuki, Hamakaze | Kitakami, Tenryuu, Tatsuta, Tama, Kiso, Isuzu, Natori, Yura, Sendai, Kinu, Abukuma | Mogami, Kako, Myoukou, Nachi, Ashigara, Haguro, Takao, Atago, Maya, Choukai, Tone, Chikuma, Kinugasa | Chitose, Chiyoda | Kaga, Souryuu, Shoukaku, Houshou, Ryuujou, Hiyou, Jun'you | I-58 | Ise, Hyuuga, Kongou, Hiei, Haruna, Kirishima, Fusou, Yamashiro |
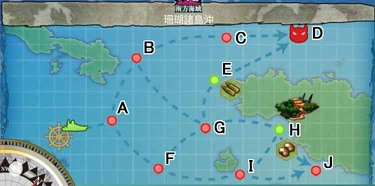
World 5-2: 珊瑚諸島沖 The Coral Islands[]
 |
| Сложность | ☆ ☆ ☆ ☆ ☆ ☆ ☆ ☆ ☆ | Предметы | |
| Опыт | 380 | Название операции | 珊瑚諸島沖海戦 (Coral Islands Naval Battle) |
| Суть операции | MO作戦を実施する。空母機動部隊を展開し、南方海域に出没する敵機動部隊を叩け! We are executing Operation MO. Form a carrier battle group and crush the enemy task force! | ||
Stage Guide[]
| Branching Rules | ||
|---|---|---|
| Nodes | Movement Condition | |
| A | B |
|
| F | ||
| B | C |
|
| G | ||
| F | G |
|
| I | ||
| G | E |
|
| H | ||
| I | H |
|
| J | ||
Tips[]
- Killing the boss will bring down the map meter 25%. After defeating the boss 4 times, she will turn into her final form in the last battle. The map meter does not regenerate.
- Considering the difficulty of the map compared to others, this is a very good map to train on if you are bored with 3-2. Bar Node G, you can intentionally send fleets to get you to node J and generally defeat easy fleet comps. This is not resource or repair friendly though (since you will get damaged one way or another).
Nodes and Enemy Encounters[]
Drops[]
| Node | Destroyer | Light Cruiser | Heavy Cruiser | Seaplane Tender | Submarine Tender | Aircraft Carrier | Submarine | Battleship |
|---|---|---|---|---|---|---|---|---|
| A | Akatsuki, Hibiki, Ikazuchi, Inazuma, Samidare, Suzukaze, Asashio, Michishio, Arashio, Kasumi, Kagerou, Shiranui, Kuroshio, Akigumo | Tenryuu, Tatsuta, Kuma, Tama, Kiso, Isuzu, Natori, Yura, Jintsuu, Naka | Mogami, Furutaka, Kako, Aoba, Myoukou, Nachi, Ashigara, Haguro, Takao, Atago, Maya, Choukai, Tone, Chikuma | Chitose, Chiyoda | Ryuujou, Hiyou, Jun'you, Shouhou | Kongou, Hiei, Haruna, Kirishima, Fusou, Yamashiro | ||
| B | Akatsuki, Hibiki, Ikazuchi, Inazuma, Samidare, Suzukaze, Asashio, Michishio, Arashio, Kasumi, Kagerou, Shiranui, Kuroshio, Maikaze, Akigumo | Tenryuu, Tatsuta, Kuma, Tama, Kiso, Isuzu, Natori, Yura, Jintsuu, Naka | Mogami, Furutaka, Kako, Aoba, Myoukou, Nachi, Ashigara, Haguro, Takao, Atago, Maya, Choukai, Tone, Chikuma | Chitose | Ryuujou, Hiyou, Jun'you, Shouhou | Kongou, Hiei, Haruna, Kirishima, Fusou, Yamashiro | ||
| C | Akatsuki, Hibiki, Ikazuchi, Inazuma, Samidare, Suzukaze, Asashio, Michishio, Arashio, Kasumi, Kagerou, Shiranui, Kuroshio, Akigumo | Tenryuu, Tatsuta, Kuma, Tama, Kiso, Isuzu, Natori, Yura, Jintsuu, Naka | Mogami, Furutaka, Kako, Aoba, Myoukou, Nachi, Ashigara, Haguro, Takao, Atago, Maya, Choukai, Tone, Chikuma | Chiyoda | Ryuujou, Hiyou, Jun'you, Shouhou | Kongou, Hiei, Haruna, Kirishima, Fusou, Yamashiro | ||
| D |
Yukikaze, Hatsuharu, Maikaze, Akigumo, Yuugumo, Hamakaze, Makigumo | Ooi, Kitakami, Tenryuu, Tatsuta, Nagara, Isuzu, Natori, Yura, Sendai, Yuubari | Mogami, Furutaka, Kako, Aoba, Myoukou, Nachi, Ashigara, Haguro, Takao, Atago, Maya, Choukai, Tone, Chikuma, Mikuma, Kinugasa | Chitose, Chiyoda | Taigei | Akagi, Kaga, Souryuu, Hiryuu, Zuikaku, Houshou, Ryuujou, Hiyou, Jun'you, Shouhou, Zuihou |
I-58 | Mutsu, Ise, Hyuuga, Kongou, Hiei, Haruna, Kirishima, Fusou, Yamashiro |
| F | Akatsuki, Hibiki, Ikazuchi, Inazuma, Samidare, Kasumi, Asashio, Kuroshio, Michishio, Akigumo | Ooi, Tenryuu, Tatsuta, Tama, Kiso, Natori, Jintsuu, Naka | Mogami, Kako, Aoba, Myoukou, Nachi, Ashigara, Haguro, Atago, Maya, Choukai, Chikuma | Chitose, Chiyoda | Ryuujou, Shouhou | Kongou, Hiei, Haruna, Kirishima | ||
| G | Akatsuki, Hibiki, Ikazuchi, Inazuma, Samidare, Suzukaze, Asashio, Michishio, Kagerou, Shiranui, Kuroshio, Akigumo | Tenryuu, Tatsuta, Kuma, Tama, Kiso, Isuzu, Natori, Yura, Naka | Mogami, Furutaka, Kako, Aoba, Myoukou, Nachi, Ashigara, Haguro, Takao, Atago, Maya, Choukai, Tone, Chikuma | Chitose, Chiyoda | Ryuujou, Hiyou, Jun'you, Shouhou | Kongou, Hiei, Haruna, Kirishima, Fusou, Yamashiro | ||
| I | Akatsuki, Ikazuchi, Michishio, Kasumi, Shiranui, Akigumo | Tenryuu, Tatsuta, Tama, Kiso, Isuzu, Natori, Jintsuu, Naka | Mogami, Furutaka, Aoba, Nachi, Ashigara, Choukai, Takao, Maya | Hiyou, Shouhou | Kongou, Haruna, Kirishima, Fusou | |||
| J | Samidare, Suzukaze, Michishio, Arashio, Kasumi, Kagerou, Kuroshio, Akigumo | Tatsuta, Tama, Yura, Jintsuu | Mogami, Furutaka, Kako, Aoba, Nachi, Haguro, Maya, Chikuma | Chitose | Ryuujou, Shouhou | Haruna, Kirishima, Fusou, Yamashiro |
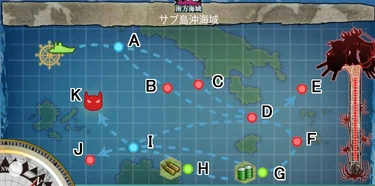
World 5-3: サブ島沖海域 Sav Island[]
 |
| Сложность | ☆ ☆ ☆ ☆ ☆ ☆ ☆ ☆ ☆ | Предметы | |
| Опыт | 400 | Название операции | 第一次サーモン沖海戦 (First Battle of the Solomon Sea) |
| Суть операции | 敵泊地に対して水上打撃部隊による夜戦突撃を敢行し、艦隊後方の敵輸送艦を叩け! Engage in a daring night raid against the enemy fleet. Your goal is to destroy the transport they are escorting! | ||
Stage Guide[]
| Branching Rules | ||
|---|---|---|
| Nodes | Movement Condition | |
| A | B |
|
| C | ||
| D | E |
|
| I | ||
| F | ||
| G | H |
|
| I | ||
| I | K |
|
| J | ||
Tips[]
- All nodes, except end nodes, are night battles only; there's also a submarine node if you have any slow ships in your fleet.
- Sinking the Flagship Wa-class transport ship at the boss node will lower the boss gauge by 20%. You need to do this 5 times to clear the map.
- 2DD, fast ship, and high torpedo stat (for night battle) is recommended. You can also use an all submarine fleet, but it will often be directed to J instead of Boss.
- Taking advantage of night battle equipment (Star Shell, Searchlight, and Type 98 Recon Seaplane (Night Scout) ) is recommended and Sparkling your ships should be considered as well.
- Unless you need S rank for drops, you do not need to destroy the Hime nor the submarine and you can bring a light fleet to deal with the Flagship Wa-class transport to clear the map instead.
- Although the S rank on boss gives you decent drops on this map, it is highly advisable to just disregard the S rank boss drop here and settle for A or B rank. All the drops here can be farmed later in the next maps which is easier to S rank for the boss.
- There's a gold submarine in the boss node. A possible tactic is to bring 1 CL flag with heavy ASW gear and 5 DD, enter battle in Line Abreast formation to deal with it quickly, get less damage from enemy ships, and thus focus on night battle. This fleet composition is the most resource efficient and can often succeed. Try double line or echelon on pre-boss nodes to absorb enemy cut-in attacks better.
- Another possible strategy is to run 2 Fast Battleships, 2 CA(V), and 2 DD. This has a high chance of reaching the boss node and can get a lucky kill on the Wa-Class but costs more fuel, steel, and ammo. Make sure not to equip bomber seaplanes such that your ships do not target the SS. A variation of this is to replace 1-2 CA(V) with CLT, but 2 CA(V) should be used for the final form because of the changes in the boss composition.
- A possible strategy is to run 3 CLTs, 1CA(V), and 2 DDs. This is the most efficient with highest Attack power/torpedo and lowest possible encounter rate (C-D-I-K)
- Akitsumaru can gain air superiority at boss node with 2 Reppu + Type 52 Zero Fighter or 3 Shiden Kai 2 which enables artillery spotting for your fleet. Keep in mind that she is a slow ship so you will suffer at submarine node instead.
- The new Aircraft Proficiency system allows Akitsumaru to gain air superiority at boss node with 2 fighter planes such as Shiden Kai 2 or Reppu at maximum proficiency. Air supremacy can be achieved with 3 Shiden Kai 2 at maximum proficiency.
- Both enemy and ally submarines do not have increased evasion during battles STARTING at night, i.e., hitting them is as easy as in any day battle.
- Another possible tactic is to send a fleet consisting of 4 or more SS. This composition is very resource-efficient, but the drawback is a lower chance of going to the boss node from I (25%). This lower chance is often offset by the higher rate of reaching the pre-boss node without suffering critical damage and allowing you to clear the stage in 20-30 sorties on average (depending on ship levels). A SS fleet tends to go to node B, where you can avoid damage by getting a C rank.
Nodes and Enemy Encounters[]
Drops[]
| Node | Destroyer | Light Cruiser | Heavy Cruiser | Seaplane Tender | Aircraft Carrier | Submarine | Battleship |
|---|---|---|---|---|---|---|---|
| B | Shikinami, Sazanami, Hatsuharu, Yuudachi | Tenryuu, Tatsuta, Kuma, Jintsuu, Yuubari | Myoukou, Ashigara, Atago, Tone, Kinugasa | Chitose | Jun'you, Shouhou | Hyuuga, Hiei, Kirishima, Fusou | |
| C | Fubuki, Ayanami, Shikinami, Mutsuki, Kisaragi, Akebono, Sazanami, Hatsuharu, Yuudachi, Asashio, Kasumi | Tenryuu, Tatsuta, Kuma, Tama, Kiso, Isuzu, Natori, Yura, Jintsuu, Naka, Yuubari | Mogami, Furutaka, Kako, Aoba, Myoukou, Nachi, Ashigara, Haguro, Takao, Atago, Maya, Choukai, Chikuma, Kinugasa | Chitose, Chiyoda | Ryuujou, Hiyou, Jun'you, Shouhou | Ise, Hyuuga, Hiei, Kirishima, Fusou, Yamashiro | |
| D | Fubuki, Ayanami, Shikinami, Mutsuki, Akebono, Sazanami, Hatsuharu, Yuudachi, Asashio, Michishio, Arashio, Kasumi | Tenryuu, Tatsuta, Kuma, Tama, Kiso, Isuzu, Natori, Yura, Naka, Jintsuu, Yuubari | Mogami, Furutaka, Kako, Aoba, Nachi, Ashigara, Haguro, Takao, Atago, Choukai, Tone, Chikuma, Kinugasa | Chitose | Hiyou, Ryuujou | I-168 | Ise, Hyuuga, Hiei, Kirishima, Fusou |
| E | Mutsuki | Tenryuu, Isuzu, Naka, Yuubari | Mogami, Furutaka, Kinugasa, Maya, Chikuma | Ryuujou | Hiei, Kirishima, Yamashiro | ||
| F | Shikinami, Akebono, Sazanami, Michishio, Kasumi, Yuudachi | Tatsuta, Kuma, Yura, Naka, Yuubari | Furutaka, Kako, Aoba, Myoukou, Takao, Atago, Kinugasa | Chitose | Hiyou, Shouhou | Ise, Hyuuga, Hiei, Kirishima, Yamashiro | |
| J | Sazanami, Yuudachi | Tama, Kiso, Isuzu, Natori, Naka, Yuubari | Mogami, Furutaka, Aoba, Nachi, Takao, Choukai, Kinugasa | Ryuujou | Ise, Hyuuga, Kirishima | ||
| K | Akigumo, Yamagumo, Yuugumo, Naganami, Uzuki, Yayoi | Ooi, Kitakami, Tenryuu, Tatsuta, Kuma, Nagara, Isuzu, Natori, Yura, Sendai, Yuubari | Mogami, Furutaka, Kako, Aoba, Myoukou, Nachi, Ashigara, Haguro, Takao, Atago, Maya, Choukai, Tone, Chikuma, Kinugasa, Suzuya | Chitose, Chiyoda | Akagi, Kaga, Souryuu, Hiryuu, Shoukaku, Zuikaku, Houshou, Ryuujou, Hiyou, Jun'you, Shouhou | I-168, I-58 | Ise, Hyuuga, Kongou, Hiei, Haruna, Kirishima, Fusou, Yamashiro |
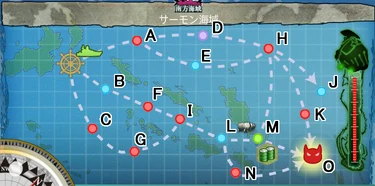
World 5-4: サーモン海域 The Slot Salmon Sea Area[]
 |
| Сложность | ☆ ☆ ☆ ☆ ☆ ☆ ☆ ☆ ☆ | Предметы | |
| Опыт | 420 | Название операции | 東京急行 (Tokyo Express) |
| Суть операции | 南方海域に有力な艦隊を投入し鼠輸送作戦を敢行、可能であれば同方面の敵艦隊も撃滅せよ! Deploy a powerful fleet and perform a vital "rat transport" operation. If possible, also destroy the enemy fleet in the area! | ||
Stage Guide[]
| Branching Rules | ||
|---|---|---|
| Nodes | Movement Condition | |
| Sortie | A |
|
| B | ||
| C | ||
| A | D |
|
| E | ||
| L | M |
|
| N | ||
| H | J |
|
| K | ||
| M | ||
Tips[]
- Like 5-3, you must sink the boss battle flagship 5 times to complete the map.
- Clearing this map with a Submarine Fleet consisting of 5-6SS is possible; However, there is a high chance that your SS won't hit the Flagship in the boss node, but the cost for resources and repair is minimum (around 50-100 resources per run).
- Using level 60+ SS (with at least maxed armor and torpedo stat) is advised, since there are several flagship DD and CL equipped with sonars and depth charges.
- This composition is best when you'd like to farm some BB or CV to feed your fleet. If your SS levels are high enough, with decent torpedoes, this composition can also be used to farm rare drops and admiral exp for ranks.
- Nodes G and I are night battles.
- Node I is a submarine node.
- Node H contains Carrier Demons while nodes K and N contains Carrier Princess.
- For farming rare ships, Admiral exp or just boss kills unlock 5-5. The recommended formation is a flagship that can carry 4 drums (Yuubari, Ooyodo, CAV) or any combination of 3 FBBs/CLTs and 2 CV. With this formation, you only need to fight Nodes A and H before reaching the boss. Using Diamond formation at Node H also reduces the chances of enemy ships targeting your flagship.
- The highest power variation of this is a fleet with 5 CVs and 1 Tone-class CAV equipped with 4 drum canisters. When equipped with >> torpedo bombers, bombers, and enough fighters for air supremacy at the dual carrier oni node variant, the composition will consistently kills 4-5 ships out of 6 in the initial strike and occasionally, kill the entire enemy fleet in the initial strike on all nodes. Compared to adding FBBs or CLTs into the mix, this variation costs more bauxite (~ 250 per full sortie) but has virtually no repair costs, close to zero risk of retreat, and lower ammunition costs.
- Another option is to use a fleet with the lowest resource consumption possible while getting maximum fuel income from node M. This will require 3 ships with 9 drum canisters equipped. 8 drums on 2 Mogami or Tone class CAV and one drum on 1 Akizuki-class DD with a HA mount and an air radar for anti-air cut-in. 3 standard carriers are also required for air supremacy at node H as well as for preemptive strikes. A basic template would include Unryuu-class or Shoukaku/Hiryuu/Souryuu class at Kai, 6 of your best >> torpedo bombers, and 6 >> fighters (Reppuu or any close variant). This should result in minus ~180-210 ammo, ~120 bauxite, ~160-180 fuel (plus 180 on node M, minus ~50 for repairs), and ~1 bucket per run.
- Some intentionally choose not to clear this map for ranking purposes. As the final version of this boss does not contain ships with ASW, it allows SS to B rank-win or above this node fairly easily (as staying in the map's final formation helps with raising one's senka).
Nodes and Enemy Encounters[]
| Nodes and Enemy Encounters | ||||
|---|---|---|---|---|
| Area | Pattern | Encountered vessels | Form | Air |
| A Day Battle |
Pattern 1 | |||
| AS+ 72 | ||||
| AS 36 | ||||
| Pattern 2 | ||||
| Pattern 3 | ||||
| B | "Must be my imagination" (battle avoided) | |||
| C Day Battle |
Pattern 1 | |||
| AS+ 84 | ||||
| AS 42 | ||||
| Pattern 2 | ||||
| AS+ 84 | ||||
| AS 42 | ||||
| Pattern 3 | ||||
| AS+ 84 | ||||
| AS 42 | ||||
| D | Without Radar | Maelstorm: Fuel -32% | ||
| With Radar(s) | Maelstorm: Fuel -24%, -19%, -16% | |||
| E | "Must be my imagination" (battle avoided) | |||
| F Day Battle |
Pattern 1 | - | ||
| Pattern 2 | - | |||
| Pattern 3 | - | |||
| G Night Battle |
Pattern 1 | |||
| AS+ 84 | ||||
| AS 42 | ||||
| Pattern 2 | ||||
| AS+ 84 | ||||
| AS 42 | ||||
| Pattern 3 | ||||
| AS+ 84 | ||||
| AS 42 | ||||
| H Day Battle |
Pattern 1 | |||
| AS+ 348 | ||||
| AS 174 | ||||
| Pattern 2 | ||||
| AS+ 300 | ||||
| AS 150 | ||||
| Pattern 3 | ||||
| AS+ 249 | ||||
| AS 125 | ||||
| I Night Battle |
Pattern 1 | |||
| AS+ 72 | ||||
| AS 36 | ||||
| Pattern 2 | ||||
| Pattern 3 | ||||
| J | "Must be my imagination" (battle avoided) | |||
| K Day Battle |
Pattern 1 | |||
| AS+ 216 | ||||
| AS 108 | ||||
| Pattern 2 | ||||
| AS+ 306 | ||||
| AS 153 | ||||
| Pattern 3 | ||||
| AS+ 288 | ||||
| AS 144 | ||||
| L | "Must be my imagination" (battle avoided) | |||
| M | ||||
| N Day Battle |
Pattern 1 | Battleship Ru-Class Flagship |
||
| Pattern 2 | Battleship Ta-Class Flagship |
|||
| O Boss Node Day Battle |
Initial | Transport Ship Wa-Class FlagshipBattleship Ru-Class FlagshipBattleship Ru-Class Flagship |
||
| Final | Transport Ship Wa-Class FlagshipBattleship Ta-Class FlagshipBattleship Ta-Class Flagship |
|||
| AS+ 228 | ||||
| AS 114 | ||||
| Cleared | Transport Ship Wa-Class FlagshipBattleship Ru-Class FlagshipBattleship Ru-Class Flagship |
|||
| Transport Ship Wa-Class FlagshipBattleship Ta-Class FlagshipBattleship Ta-Class Flagship |
||||
| AS+ 228 | ||||
| AS 114 | ||||
| Transport Ship Wa-Class FlagshipBattleship Ru-Class FlagshipBattleship Ru-Class Flagship |
||||
| AS+ 144 | ||||
| AS 72 | ||||
Drops[]
| Node | Destroyer | Light Cruiser | Heavy Cruiser | Seaplane Tender | Aircraft Carrier | Submarine | Battleship |
|---|---|---|---|---|---|---|---|
| A | Fubuki, Hatsuyuki, Ayanami, Mikazuki, Mochizuki, Mutsuki, Satsuki, Kagerou, Akatsuki, Hibiki, Yuudachi, Samidare, Suzukaze, Makigumo | Tenryuu, Nagara, Isuzu, Yura, Sendai, Jintsuu | Furutaka, Kako, Aoba, Myoukou, Haguro, Takao, Atago, Maya, Choukai, Tone, Chikuma, Kinugasa | Chitose | Ryuujou, Jun'you | Kongou, Hiei, Haruna, Kirishima | |
| C | Yura, Sendai, Jintsuu | Furutaka | Ryuujou, Jun'you | Kirishima | |||
| F | Fubuki, Hatsuyuki, Ayanami, Shikinami, Satsuki, Mikazuki, Mochizuki, Akatsuki, Inazuma, Yuudachi, Suzukaze, Kagerou, Makigumo, Naganami | Tenryuu, Nagara, Isuzu, Yura, Sendai, Jintsuu | Furutaka, Kako, Aoba, Myoukou, Takao, Atago, Maya, Choukai, Tone, Chikuma, Kinugasa | Chitose | Ryuujou, Jun'you | Kongou, Hiei, Haruna, Kirishima | |
| G | Kagerou, Makigumo, Naganami | Nagara, Yura, Jintsuu | Kako, Maya, Choukai, Tone | Jun'you | Haruna, Kirishima | ||
| H | Fubuki, Hatsuyuki, Ayanami, Murakumo, Mutsuki, Satsuki, Mikazuki, Mochizuki, Akatsuki, Ikazuchi, Inazuma, Yuudachi, Samidare, Suzukaze, Kagerou, Kuroshio, Makigumo, Naganami | Tenryuu, Nagara, Isuzu, Yura, Sendai, Jintsuu | Furutaka, Kako, Aoba, Haguro, Takao, Atago, Maya, Choukai, Tone, Chikuma, Kinugasa | Chitose | Ryuujou, Jun'you | Kongou, Hiei, Haruna, Kirishima, Yamashiro | |
| I | Fubuki, Hatsuyuki, Ayanami, Satsuki, Mikazuki, Mochizuki, Akatsuki, Inazuma, Yuudachi, Suzukaze, Kagerou, Kuroshio, Makigumo, Naganami | Tenryuu, Nagara, Isuzu, Yura, Sendai, Jintsuu | Furutaka, Kako, Aoba, Takao, Maya, Tone, Kinugasa | Chitose | Ryuujou, Jun'you | Kongou, Haruna, Kirishima | |
| K | Fubuki, Murakumo, Inazuma, Satsuki, Mikazuki, Mochizuki, Ikazuchi, Samidare, Naganami | Tenryuu, Sendai, Jintsuu | Kinugasa | Chitose | Ryuujou | ||
| N | Fubuki, Mochizuki, Akatsuki, Ikazuchi, Inazuma, Kagerou, Yuugumo, Makigumo, Naganami | Tenryuu, Nagara, Yura, Sendai | Furutaka, Aoba, Myoukou, Haguro, Atago, Choukai, Tone, Chikuma, Kinugasa | Ryuujou | Kongou, Hiei, Kirishima | ||
| O | Fubuki, Hatsuyuki, Murakumo, Ayanami, Shikinami, Mutsuki, Satsuki, Mikazuki, Mochizuki, Akatsuki, Ikazuchi, Inazuma, Yuudachi, Samidare, Suzukaze, Kagerou, Kuroshio, Akigumo, Yuugumo, Yukikaze, Makigumo, Naganami, Yayoi, Uzuki, Hamakaze | Tenryuu, Nagara, Isuzu, Yura, Sendai, Jintsuu, Yuubari, Agano | Furutaka, Kako, Aoba, Myoukou, Ashigara, Haguro, Takao, Atago, Maya, Choukai, Tone, Chikuma, Kinugasa, Suzuya, Kumano | Chitose | Ryuujou, Hiyou, Jun'you, Shoukaku, Zuikaku, Zuihou | I-19, I-58 | Mutsu, Hyuuga, Kongou, Hiei, Haruna, Kirishima, Fusou, Yamashiro |
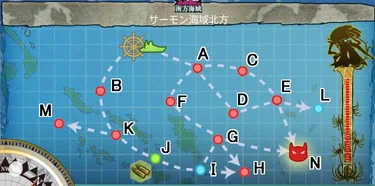
World 5-5:【Extra Operation】サーモン海域北方 Northern Salmon Sea Area[]
 |
| Сложность | ☆☆☆☆☆☆☆☆☆☆☆ | Предметы | |
| Опыт | 450 | Название операции | 第二次サーモン海戦 (Second Battle of the Solomon Sea) |
| Суть операции | 南方海域に敵の有力な機動部隊の接近が確認された。空母機動部隊を以て、これを迎撃せよ!
The approach of a powerful enemy task force has been confirmed in southern waters. Form a carrier task force and intercept it! | ||
Stage Guide[]
| Branching Rules | ||
|---|---|---|
| Nodes | Rules | |
| Starts with | A |
|
| B | ||
| A | C |
|
| D | ||
| F | ||
| E | L |
|
| N | ||
| G | H |
|
| N | ||
| K | J |
|
| M | ||
| I | G |
|
| H | ||
- You must sink the Boss Standard Carrier Wo-class Kai Flagship 5 times to clear the Map.
- Nodes C, H, K, and M are night battles.
- Having 4 ships capable of equipping Drum Canisters (DD/CL/CAV) and a total of 5 Drum Canisters will take you to node B. Other compositions will always take you to node A.
- Fleet with 3 SS or more will take you to node F where there are enemy CLs and DDs with ASW.
- Fleet with only fast ships will take you to node D. It is possible to bring slow ships if the fleet has 2 CV and 1 CVL. Other composition will take you to node C where you will meet 6 enemy SS in night battle.
- The recommended fleet composition is 3 BB, 2 CV, and 1 CVL for maximum firepower and survivability.
- After the introduction of the air proficiency, a fleet composition of 2 FBB and 4 CV is also recommended. This strategy focuses on a powerful opening airstrikes with many torpedo bombers. As long as fighter power is maintained above 420, the planes shot down should be minimal.
- There is a sub at the boss node. Getting S rank at the boss is possible, but not recommended. It is advisable to ignore the sub and just settle for an A or B rank.
- Using submarines in the map (3 BB 3 SS) taking you to A-F-G-N is possible. 3+ SS gets you to node F but more than 3 SS gets you to node H instead of N.
- Clearing this map rewards 1 medal and 200 points for ranking. The boss HP bar is reset at the beginning of each month, allowing the reward to be obtained again.
Nodes and Enemy Encounters[]
| Nodes and Enemy Encounters | ||||
|---|---|---|---|---|
| Area | Pattern | Encountered vessels | Form | Air |
| A 敵前衛警戒部隊 |
Pattern 1 | Battleship Re-Class |
||
| AS+ 351 | ||||
| AS 176 | ||||
| Pattern 2 | Battleship Re-Class |
|||
| AS+ 420 | ||||
| AS 210 | ||||
| Pattern 3 | Battleship Re-Class |
|||
| AS+ 420 | ||||
| AS 210 | ||||
| B 敵前衛警戒部隊 Day Battle |
Pattern 1 | Battleship Re-Class |
||
| AS+ 351 | ||||
| AS 176 | ||||
| Pattern 2 | Battleship Re-Class |
|||
| AS+ 420 | ||||
| AS 210 | ||||
| Pattern 3 | Battleship Re-Class |
|||
| AS+ 420 | ||||
| AS 210 | ||||
| C Night Battle |
Pattern 1 | - | ||
| Pattern 2 | - | |||
| Pattern 3 | ||||
| AS+ 69 | ||||
| AS 35 | ||||
| D 敵任務部隊前衛 Day Battle |
Pattern 1 | |||
| AS+ 222 | ||||
| AS 111 | ||||
| Pattern 2 | ||||
| AS+ 222 | ||||
| AS 111 | ||||
| Pattern 3 | ||||
| AS+ 513 | ||||
| AS 257 | ||||
| E 敵水上打撃部隊 Day Battle |
Pattern 1 | Battleship Re-Class Elite |
||
| AS+ 321 | ||||
| AS 161 | ||||
| Pattern 2 | Battleship Re-Class Elite |
|||
| AS+ 321 | ||||
| AS 161 | ||||
| Pattern 3 | Battleship Re-Class Elite |
|||
| AS+ 321 | ||||
| AS 161 | ||||
| F 敵対潜警戒部隊 Day Battle |
Pattern 1 | |||
| AS+ 69 | ||||
| AS 35 | ||||
| Pattern 2 | - | |||
| G 敵水上打撃部隊 Day Battle |
Pattern 1 | Battleship Re-Class Elite |
||
| AS+ 321 | ||||
| AS 161 | ||||
| Pattern 2 | Battleship Re-Class Elite |
|||
| AS+ 321 | ||||
| AS 161 | ||||
| Pattern 3 | Battleship Re-Class Elite |
|||
| AS+ 321 | ||||
| AS 161 | ||||
| H 敵水上打撃部隊 Night Battle |
Pattern 1 | Battleship Re-Class Elite |
||
| AS+ 321 | ||||
| AS 161 | ||||
| Pattern 2 | Battleship Re-Class Elite |
? | ||
| AS+ 321 | ||||
| AS 161 | ||||
| Pattern 3 | Battleship Re-Class Elite |
? | ||
| AS+ 321 | ||||
| AS 161 | ||||
| I | "Must be my imagination" (battle avoided) | |||
| J | ||||
| K 敵水上打撃部隊 Night Battle |
Pattern 1 | Battleship Re-Class EliteBattleship Re-Class |
||
| AS+ 603 | ||||
| AS 302 | ||||
| Pattern 2 | Battleship Re-Class EliteBattleship Re-Class |
|||
| AS+ 603 | ||||
| AS 302 | ||||
| Pattern 3 | Battleship Re-Class EliteBattleship Re-Class |
? | ||
| AS+ 321 | ||||
| AS 161 | ||||
| L | "Must be my imagination" (battle avoided) | |||
| M 敵対潜警戒部隊 Night Battle |
Pattern 1 | - | ||
| Pattern 2 | - | |||
| Pattern 3 | ||||
| AS+ 69 | ||||
| AS 35 | ||||
| N 敵任務部隊本隊 Day Battle |
Initial | |||
| AS+ 711 | ||||
| AS 356 | ||||
| Final | ||||
| AS+ 753 | ||||
| AS 377 | ||||
| Cleared | ||||
| AS+ 711 | ||||
| AS 356 | ||||
| AS+ 753 | ||||
| AS 377 | ||||
| Battleship Re-Class Elite |
||||
| AS+ 711 | ||||
| AS 356 | ||||
| Area | Pattern | Encountered vessels | Form | Air |
Drops[]
| Node | Destroyer | Light Cruiser | Heavy Cruiser | Seaplane Tender | Aircraft Carrier | Submarine | Battleship |
|---|---|---|---|---|---|---|---|
| A | Shiratsuyu, Mochizuki, Kagero, Mutsuki, Shigure, Suzukaze | Yura, Nagara | Chikuma, Haguro, Maya, Takao, Atago | Ryuujou | Hiei, Kirishima | ||
| B | Chitose | ||||||
| C | |||||||
| D | Ayanami, Shikinami, Shiratsuyu, Kagerou, Mutsuki, Suzukaze, Mochizuki, Shigure, Suzukaze, Akigumo | Yura, Jintsuu | Haguro, Tone, Takao, Chikuma, Maya | Chitose | Ryuujou | Hiei, Kirishima | |
| E | Shigure, Suzukaze, Mochizuki, Shiratsuyu, Mutsuki, Kagerou, Maikaze, Akigumo, Ayanami, Shikinami, Makigumo | Yura, Nagara | Myoukou, Maya, Chikuma, Takao, Suzuya | Chitose | Ryuujou | Hiei | |
| F | Nagara | Takao, Atago | Chitose | ||||
| G | Haguro | ||||||
| H | |||||||
| K | |||||||
| M | |||||||
| N | Uzuki , Yuugumo, Makigumo , Yayoi | Yura, Nagara, Agano | Atago, Myoukou, Suzuya, Takao | Chitose | Shoukaku | Kirishima, Hiei |
Links[]
| Карты | ||
|---|---|---|